Comet Sailplane
Project
For the first time in weeks, I do not have to
get up to covering, or doping, or spraying on the Sailplane! :O) I got
@!##$ tired of doing all of that day after day after day. Would you believe Nate Dickerson who owns Klass Kote called me last night from New Jersey.
He is on my Sailplane distribution list and had read about my stab
finishing problem. He had me tell him every step I did leading up to the
occurrence of the not so satin finish on the top of the stab. Nate wants
to pass this along to his chemist and see if they can duplicate the
problem and determine what happened. He said he would call me once they
have the determination. Now that is some good follow up by a manufacturer,
don't you think.
Today I spent the morning cleaning up the model
room, getting rid of all of the mixing jars, paper towels, and left over
Klass Kote that was mixed up. Then I started on the Sailplane's final
installations and assemblies. One of the first things I did today is to
put in, align, and bond in all of the hinge halves in the fin/rudder and
stab/elevator. It is always a little tricky wicking thin CA down along
side the tongues on the hinge halves. However, if you are careful it goes
pretty well.
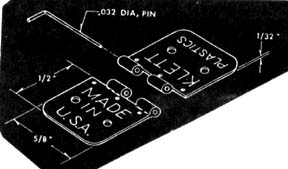
If you recall from Report No. 24, the elevators
and rudder control surfaces on the Sailplane are hinged using a two-part
Klett nylon hinge shown below. The short pin is discarded and long piano
type pin made out of 1/32" wire is used. The stab/elevators and the
fin/rudder are hinged during construction, but the hinge halves were
not glued in. They were removed for covering and doping the surfaces.
Once the surfaces were covered, doped, and
sprayed with satin Klass Kote the hinge halves were reinserted into their
slots and the hinges were completely realigned. Then the long piano type pin
was removed in order to permanently bond the hinge halves in their
individual slots as shown below. I have use thin drops of Jett CA to wick
down in between the hinge tongue and the balsa slot in several places as
shown below, which takes a pretty steady hand and lots of time. Much care
has to be taken because if the CA ever wicks into the hinge loops you are
deep trouble. For years I have blunted the tip of a straight pin with a
file. A drop of CA is applied to the blunted end of the straight pin and
used to apply the CA to the hinge. This takes a lot of practice and you
waste a lot of thin CA trying to get the drop to stay on the end straight
pin, but it can be done, given enough time and patience.

*********GREAT TIP*********
Well today my friend James Lollar from Ada,
Oklahoma, clued me in on how to accomplish this task almost effortlessly.
For years he has used a sowing needle with the tip of the eye cut off as
shown below. When he puts a drop of thin CA on the needle, the drop will
always catch and stay in the fork due to surface tension. Then he can easily
touch the fork to the desired spot on the hinge and the CA goes right into
where he wants. I completed bonding in all twelve hinge halves on the stab,
two elevators, fin, and rudder in less than an hour this afternoon. Now why
had I never thought of this simple approach in all my years of modeling?
Thanks James for the great tip!

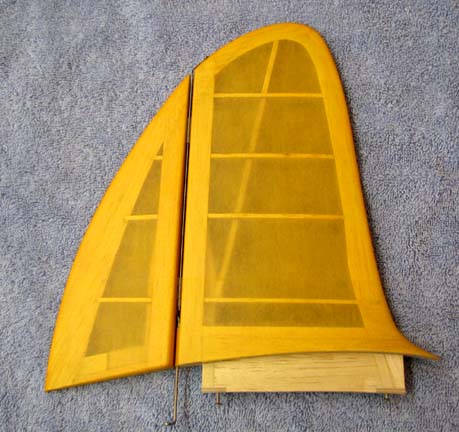
I got the fin/rudder assembled as shown below,
but I will wait until tomorrow to assemble the
stab/elevators..................Tandy